【Pandas入門】データフレームのインデックスやカラム操作方法メモ

今回はjupyter notebookを使ってPandasのインポート〜データフレームの作成、インデックスやカラムの変更、データ操作まで行ってみた過程をメモしていきます。
Pandasインポート〜データフレーム作成

まずPandasをインポート。
import pandas as pd
Pandasでデータフレームを作成する
データフレームでは2次元配列を作成する為、
df = pd.DataFrame([[◯,◯,◯],[◯,◯,◯],[◯,◯,◯]]) (二重カッコでリストを作成)となります。
とりあえず、上の形でデータフレームを作成してみます。
f = pd.DataFrame([[1,2,3],[4,5,6],[7,8,9]])
表示させる為に、以下実行。
df
>>>
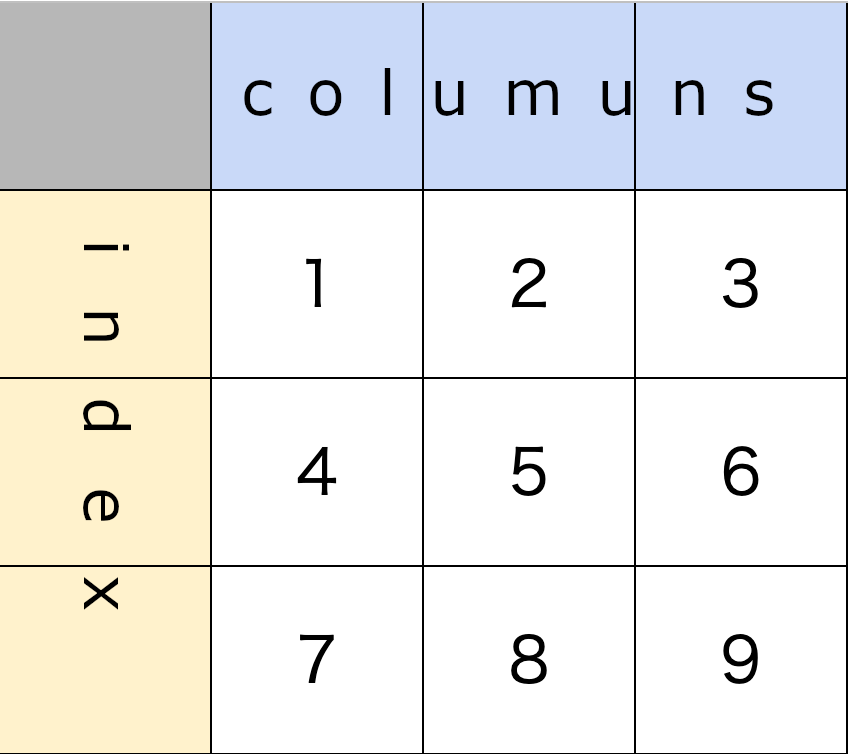
| 0 | 1 | 2 | |
| 0 | 1 | 2 | 3 |
| 1 | 4 | 5 | 6 |
| 2 | 7 | 8 | 9 |
行列名が無いデータフレームが完成しました。
そもそも2次元配列とは?
以下の様に、縦(行)と横(列)がある配列の事を言います。
| 行名1 | 行名2 | 行名3 | |
| 列名1 | 1 | 5 | 9 |
| 列名2 | 2 | 6 | 10 |
| 列名3 | 3 | 7 | 11 |
| 列名4 | 4 | 8 | 12 |
以下の様に1行のみの配列は一次元配列となります。
| 列名1 | 1 |
| 列名2 | 2 |
| 列名3 | 3 |
| 列名4 | 4 |
先に作成した行列名無しのリストは、
df.columns = ["カラム名1","カラム名2",....]
df.index = ["インデックス名1","インデックス名2",….]
で後から記述できます。
df.columns = ["col1","col2","col3"]
df.index = ["index1","index2","index3"]
df
| col1 | col2 | col3 | |
| idx1 | 1 | 2 | 3 |
| idx2 | 4 | 5 | 6 |
| idx3 | 7 | 8 | 9 |
尚、行列数と要素数が合わないと以下の様なエラーが出現します。
df.columns = ["col1","col2"] #要素数不足
>>>
ValueError: Length mismatch: Expected axis has 3 elements, new values have 2 elements

df.columns = ["col1","col2","col3","col4"] #要素数オーバー
>>>ValueError: Length mismatch: Expected axis has 3 elements, new values have 4 elements
次に、最初から変数 df に2次元リスト、カラム名、インデックス名を記載し、グラフを作成します。
df = pd.DataFrame([[1,2,3],[4,5,6],[7,8,9]],columns=["col1","col2","col3"],index=["idx1","idx2","idx3"])
df
>>>
下のグラフがnotebook上に表示されました。
| col1 | col2 | col3 | |
| idx1 | 1 | 2 | 3 |
| idx2 | 4 | 5 | 6 |
| idx3 | 7 | 8 | 9 |
辞書型を使ってデータフレームを作成する
辞書型を使うことで、カラム毎にリストを作成することができます。
df2 = pd.DataFrame({"col1":[1,2,3],"col2":[4,5,6],"col3":[7,8,9]},index=["idx1","idx2","idx3"])
df
>>>
下のリストがnotebookに表示されます。
| col1 | col2 | col3 | |
| idx1 | 1 | 2 | 3 |
| idx2 | 4 | 5 | 6 |
| idx3 | 7 | 8 | 9 |
インデックス、カラムの操作方法
インデックス、カラムの取得・変更方法
変数名.index でインデックスを取得する。
df.index
>>>Index(['idx1', 'idx2', 'idx3'], dtype='object')
dtypeはindexのデータ型を表しています。
変数名.columns でカラムを取得する。
df.columns
>>>Index(['col1', 'col2', 'col3'], dtype='object')
次にカラム名を変更してみます。
df.columns = ["から1","から2","から3"]
df
| から1 | から2 | から3 | |
| index1 | 1 | 2 | 3 |
| index2 | 4 | 5 | 6 |
| index3 | 7 | 8 | 9 |
同様にインデックス名も変更も可能です。
renameメソッドを使ってカラム名とインデックス名を変更する
renameメソッドは行名や列名を変更することができます。
df = df.rename(columns={"既存行名": "変更先行名"})
df = df.rename(index={"既存列名": "変更先列名"})
まずはカラム名を変更してみます。
df = df.rename(columns={"col1":"から1","col2":"から2"})
df
>>>
| から1 | から2 | col3 | |
| index1 | 1 | 2 | 3 |
| index2 | 4 | 5 | 6 |
| index3 | 7 | 8 | 9 |
次にインデックス名を変更してみます。
df = df.rename(index={"index1":"インド1","index2":"インド2"})
df
>>>
| から1 | から2 | col3 | |
| インド1 | 1 | 2 | 3 |
| インド2 | 4 | 5 | 6 |
| index3 | 7 | 8 | 9 |
データの取得方法
データフレームから列を取得する方法
df[“カラム名”]を使う
df["取得したいカラム名"] でデータフレームからシリーズとして取得したい列を取得することができます。
df["col1"]
>>>
index1 1
index2 4
index3 7
Name: col1, dtype: int64
列の値とそれに対応するデータ、カラム名、データ型を取得できました。
また、df[["取得したいカラム名"]] とすることで、データフレーム形式で取得することができます。
df[["col1"]]
>>>
| col1 | |
| index1 | 1 |
| index2 | 4 |
| index3 | 7 |
尚、df[“col1”]はシリーズ型に変換され、df[[“col1”]]はデータフレーム型です。
確認してみます。
type(df["col1"])
>>>pandas.core.series.Series

type(df[["col1"]])
>>>pandas.core.frame.DataFrame
カラム名やインデックス名を指定して取得する方法
locを使ってインデックス・カラム名を指定する方法
locを用いて複数要素を取得する方法です。
df.loc["インデックス","カラム"] となり、各々スライス表記を用いることができます。
まずは1要素のみ取得してみます。
df.loc["index1","col1"]
>>>1
次に複数要素を取得してみます。
df.loc["index1":"index2","col1":"col3"]
>>>
| col1 | col2 | col3 | |
| index1 | 1 | 2 | 3 |
| index2 | 4 | 5 | 6 |
要素を全て取得したい場合は[:]の表記が使えますので、以下の様に記載しても同様のリストが取得できます。
df.loc["index1":"index2",:]
>>>
| col1 | col2 | col3 | |
| index1 | 1 | 2 | 3 |
| index2 | 4 | 5 | 6 |
また、df.loc["インデックス名"] とすることで、列をシリーズで取得することができます。
df.loc["index1"]
>>>
col1 1
col2 2
col3 3
Name: index1, dtype: int64

#データ型を確認
type(df.loc["index1"])
>>>
pandas.core.series.Series
カラム・インデックスの場所を指定して取得する方法
ilocを使って取得する方法
ilocを用いて複数要素を取得する方法です。
df.iloc["インデックス番号","カラム番号"] となり、各々スライス表記を用いることができます。
まずは、1要素のみ取得してみます。
df.iloc[0,0]
>>>1
次にスライス表記を使って、複数取得してみます。
df.iloc[0:3,1:3]
>>>
| col2 | col3 | |
| index1 | 2 | 3 |
| index2 | 5 | 6 |
| index3 | 8 | 9 |
要素を全て取得したい場合は[:]の表記が使えますので、以下の様に記載しても同様のリストが取得できます。
df.iloc[:,1:3]
>>>
| col2 | col3 | |
| index1 | 2 | 3 |
| index2 | 5 | 6 |
| index3 | 8 | 9 |
一つの要素を取得する方法
atを使って取得する方法
atを用いて1つの要素を取得する方法です。
df.at["インデックス","カラム"] となり、スライス表記を用いることはできません。
df.at["index1","col2"]
>>>2
iatを使って取得する方法
iatを用いて1つの要素を取得する方法です。
df.at["インデックス番号","カラム番号"] となり、スライス表記を用いることはできません。
df.iat[0,1]
>>>2
データの変更方法
locを使ってデータを変更する方法
| col1 | col2 | col3 | |
| idx1 | 1 | 2 | 3 |
| idx2 | 4 | 5 | 6 |
| idx3 | 7 | 8 | 9 |
まずはlocを使ってデータを取得します。
df.loc["index2","col1"]
>>>4
このデータに新しいデータを代入することで、データを変更することができます。
df.loc["index2","col1"] = 20
df
>>>
| col1 | col2 | col3 | |
| index1 | 1 | 2 | 3 |
| index2 | 20 | 5 | 6 |
| index3 | 7 | 8 | 9 |
次に複数のデータを変更していきます。
左辺はlocのスライスを用いて複数データを取得、右辺でリストを使い上書きを行います。
df.loc[:,"col3"] = [33,36,39]
df
>>>
| col1 | col2 | col3 | |
| index1 | 1 | 2 | 33 |
| index2 | 20 | 5 | 36 |
| index3 | 7 | 8 | 39 |
df.loc["index1":"index2","col1":"col2"] = [[11,22],[14,25]]
df
>>>
| col1 | col2 | col3 | |
| index1 | 11 | 22 | 33 |
| index2 | 14 | 25 | 36 |
| index3 | 7 | 8 | 39 |
ilocを使ってデータを変更する方法
| col1 | col2 | col3 | |
| idx1 | 1 | 2 | 3 |
| idx2 | 4 | 5 | 6 |
| idx3 | 7 | 8 | 9 |
まずはilocを使ってデータを取得します。
df.loc[1,1]
>>>5
このデータに新しいデータを代入することで、データを変更することができます。
df.iloc[1,1] = 25
df
>>>
| col1 | col2 | col3 | |
| idx1 | 1 | 2 | 3 |
| idx2 | 4 | 25 | 6 |
| idx3 | 7 | 8 | 9 |
次に複数のデータを変更していきます。
左辺はilocのスライスを用いて複数データを取得、右辺でリストを使い上書きを行います。
df.iloc[:,1] = [20,20,20]
df
>>>
| col1 | col2 | col3 | |
| idx1 | 1 | 20 | 3 |
| idx2 | 4 | 20 | 6 |
| idx3 | 7 | 20 | 9 |
df.iloc[1:3,1:3] = [[22,23],[32,33]]
df
>>>
| col1 | col2 | col3 | |
| idx1 | 1 | 20 | 3 |
| idx2 | 4 | 22 | 23 |
| idx3 | 7 | 32 | 33 |
get_locメソッドで行・列番号を取得する
get_locメソッドを用いて、行番号・列番号を取得していきます。
df.columns.get_loc("コラム名") でコラム名の行番号を、df.index.get_loc("インデックス名") でインデックス名の列番号を取得できます。
df.columns.get_loc("col2")
>>>1

df.index.get_loc("idx1")
>>>0